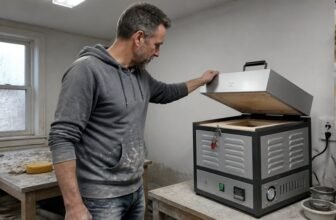
Are small kilns worth it for the potter testing the waters of glaze chemistry? If you are currently tripping over buckets of test tiles in your studio and hesitating to fire a full load just to see if one new glaze will work, a small kiln might be your answer.
This article walks through what these compact kilns really cost to buy and run, how long they take to reach cone 6, and the safety quirks of plugging one into your home’s electrical system.
We will also look at how many mugs or tiles you can actually fit inside, so you know if it fits your studio routine. By the end, you will know if a small kiln is a smart tool for your tests or a waste of your shelf space.
From there, we dive straight into the upfront price and the electrical setup you will need before you ever load a shelf.

Fits on a studio bench and fires test pieces fast.

Compact firing for glaze tests without full-size kiln cost.

Quick heat-up and cool-down let you iterate on glazes daily.
Check discounted items inTabletop Kilns
Quick Answer
- Choose a small kiln for glaze testing and iteration, not production volume.
- Compare the lower upfront cost with possible $300 to $800 electrical upgrades.
- Save 4 to 6 hours per firing cycle to support daily testing.
- Plan for element replacement every 3 to 6 months with rapid heat cycling.
- Place kilns on non-combustible surfaces with ventilation and supervised firing runs.
How Is a Small Kiln Different From a Full-Size One?
A small kiln is built for speed, economy, and iteration. Full-size kilns are designed for mass production, and the two behave very differently.
Small kilns trade scale for speed, sacrificing mass production for daily experimentation and rapid iteration.
A tiny chamber heats and cools fast, which is ideal for daily glaze tests. It will not mimic a big kiln’s steady soak, so don’t expect identical results.
A $1,200 tabletop model plugs into a standard outlet. A large kiln can cost $4,000 plus electrician rewiring, so the small unit saves money upfront.
Per-firing electricity costs are roughly the same for both sizes. The small kiln wins on flexibility, not energy efficiency.
Firing to Cone 6 in under 24 hours lets you burn through 50 test tiles in a day. If a batch fails, you lose only a few pieces instead of a full load.
Buy a small kiln for experimentation. Choose a full-size kiln when you need production output.
How Many Pots Fit in a Test Kiln?

Capacity math is simple once you stop thinking in production terms. A typical 0.8-cubic-foot test kiln, like the Skutt KM-614, fits roughly 5–8 mugs or a mix of 3 mugs plus 2 bowls, depending on your packing skills.
The chamber is 13.5 inches deep, so height limits matter more than floor space. That lets you fire taller forms than the shorter 0.3-cubic-foot L&L Plug-N-Fire.
Mugs stack 4–5 per shelf, with two shelves max. Bowls run 2–3 per level, and wider bases eat floor space fast.
Test tiles lay flat at 20–30 per load, which makes a glaze chemist happy. For pure experimentation, 40–50 tiles in one firing beats a lone pot.
Don’t expect production volume; that’s what big kilns are for. A test kiln is a glorified sampling tray, not a mini factory.
Can a Small Kiln Run on a Standard Outlet?

Yes, a small kiln can run on a standard outlet, but only if it’s a 120-volt model on a dedicated 20-amp circuit. A kiln like the Skutt KM-614 will fire fine on that setup, which most homes have.
The catch is the word “dedicated.” While the kiln fires, nothing else can draw power from the same circuit, or you’ll likely trip the breaker. Check your panel to confirm which outlets share that circuit before you plug in.
If your outlet isn’t dedicated, you have two options: run an extension cord rated for the kiln’s amperage, or call an electrician to install a new circuit. Don’t guess on this, because a kiln pulls steady current for hours.
For wiring questions, always follow the kiln manufacturer’s instructions and your local electrical code. A qualified professional can tell you if your home’s service can handle the load.
Once the circuit is sorted, you can fire bisque or glaze cones without worry. Just keep the kiln clear of clutter and never leave it unattended during a firing.
Power Requirements
Two questions dominate every kiln shopper’s mind: “What will it cost?” and “Can I just plug it in?” Sometimes yes, but it’s not a guarantee.
Most small kilns, like the Skutt KM-614, need a dedicated 20-amp circuit, not the usual 15-amp wall outlet. Others, like the L&L Plug-N-Fire, are gentler on your home’s wiring, sipping just 15 amps at 120 volts.
Check these before you buy:
- Breaker compatibility: Verify your panel’s amperage rating. An older home might trip on a small kiln’s startup surge.
- Phase conversion: If your studio uses three-phase power, you’ll need a converter. Expect to add $300 to $500.
- Wiring gauge: Heavier draws require thicker wire. An electrician’s inspection is worth the $100.
A 15-amp outlet works for a few models, but most need a simple breaker swap. Drop by your local clay supplier or call a licensed electrician to confirm what your setup allows.
Standard Outlet Fit
A standard outlet fit usually means 120 volts, but amp draw matters more than voltage. The Skutt KM-614 needs a 20-amp breaker, so a typical 15-amp kitchen circuit won’t handle it.
That’s where plug compatibility gets tricky. The L&L Plug-N-Fire runs happily on a standard 15-amp receptacle, making it the easiest small kiln to plug in.
For that one, you’re fine immediately as shipped. But most other small kilns? You’ll likely need an electrician to add a dedicated 20-amp line.
Check your breaker before you buy. If you’re unsure, the Plug-N-Fire’s low draw is your safest bet, with no rewiring and no surprises.
Otherwise, budget for electrical work, not just the kiln. Follow the manufacturer’s instructions or local codes when planning any wiring changes.
What Does a Small Kiln Really Cost to Buy and Run?
A small kiln’s real cost goes well beyond the price tag. Expect to pay $1,000 to $2,000 upfront, then add an electrician’s fee if your garage needs a dedicated circuit or a new outlet.
Once the kiln is wired, a single Cone 6 firing costs only a few dollars in electricity. Run it two hundred times a year and that adds up fast.
Your total expense is the purchase price, the setup work, and the power you use over time. Plan for each before you buy.
Purchase Price vs. Setup
A tiny kiln’s list price rarely tells the whole story. A basic 0.8-cubic-foot Skutt KM-614 runs about $1,200, but setup can add another $200 to $400, depending on your studio’s electrical setup.
Some models, like the L&L Plug-N-Fire, use a standard 15-amp outlet, which keeps things simple. Budget for a dedicated 20-amp receptacle if your current outlet is too weak, plus a non-combustible stand or table and fireproof clearance.
Shipping, tax, and a kiln furniture starter pack add to the total. Expect the real cost to land 10 to 20 percent above the sticker price.
That still comes in at half the cost of a big kiln, and it pays off for test batches and bisque loads.
Electrical Upgrades and Wiring
Most buyers focus on the sticker price, but the real budget-breaker hides behind the wall: electric service. A tiny 120-volt kiln like the Skutt KM-614 plugs into a standard household outlet, yet it demands a 20-amp breaker panel rating. That’s not always a given, especially in older studios.
Check your panel first. Upgrading it can cost $300–$800.
Some small units need a dedicated circuit, meaning nothing else runs on that line. No coffee maker, no space heater. Doll kilns at 15 amps run cooler but slower.
An electrician’s visit is rarely fun, but skipping it risks tripped breakers mid-fire. That’s a ruined bisque batch. The plug-and-play L&L avoids this fuss, but the Skutt’s wiring is still manageable.
Budget for the hookup, not just the kiln. For any wiring questions, follow the manufacturer’s instructions and your local electrical codes.
Operating Cost Per Firing
Once the electrician’s invoice is filed away, the real question sneaks in: what does each firing actually set you back? The operating cost per firing for a small kiln is surprisingly comparable to a big one, since both run similar firing cycle times.
The 240-volt large kiln edges out efficiency slightly, but the per-load difference is negligible. You’re paying for speed, not savings.
A 120-volt test kiln draws less power per hour but fires just as long, so total kWh lands close to a large kiln’s. Small loads mean higher per-piece energy, but you fire only what you need.
Expect $2–$5 per cone-6 firing, depending on local rates. Small kilns cost about the same per firing but waste far less clay and glaze on experiments.
That’s the real bargain.

Fire dozens of test tiles per load and fail fast.

Dedicated chamber for glaze chemistry experiments and cone 6 cycles.

Sized for test tiles; speeds up glaze development and saves space.
See today's best deals onTest Kilns
How Fast Can You Fire and Unload a Small Kiln?
A small kiln gets you from cold to Cone 6 and back to unloaded in about 23 to 24 hours. That is fast enough for near-daily turnarounds.
You are not saving time on firing intervals. The clay still needs slow heating to burn off impurities.
The real win is the shorter cool down time. You can pop the lid after eight hours instead of waiting a full day.
| Stage | Small Kiln | Large Kiln |
|---|---|---|
| Heat-up to Cone 6 | 6–8 hrs | 8–10 hrs |
| Cool down time | 8–10 hrs | 12–16 hrs |
| Total to unload | ~24 hrs | ~28 hrs |
Those extra hours add up across a week of tests. You can fire two batches back-to-back if your glaze schedule allows.
That is the practical edge, not raw speed.
Why Glaze Testing Is the Small Kiln’s Superpower
The small kiln’s real superpower is turning glaze testing from a slow, expensive chore into a daily habit. With a chamber this tiny, you can fire off 40 test tiles in one afternoon, then tweak and refire by dinner.
That loop cracks glaze chemistry wide open. You are iterating like a mad scientist with a timer, not guessing anymore.
New recipes get instant feedback, so a bad batch costs you a few cents instead of a full kiln load. Surface testing becomes routine, catching pinholes or crazing before they ruin a production piece.
Experiment freely. A failed test is just a tiny rock, not a tragedy.
If you love glazes, this little box pays for itself in curiosity alone.
Why a Small Kiln’s Element Life Falls Short in Production
Small kilns heat up fast, but that speed wears out their elements quickly. A compact chamber cycles heat more aggressively per firing, so the wire expands and contracts rapidly, which cracks it sooner than a larger kiln’s elements.
Element wear accelerates with each firing, and thermal shock does the real damage. Your big kiln jogs through a firing, while a small test kiln sprints.
| Firing Frequency | Small Kiln Element Life |
|---|---|
| Once a week | 1–2 years |
| Twice a week | 6–12 months |
| Daily production | 3–6 months |
| Multiple loads/day | Weeks to months |
If you fire daily, plan on replacing elements once a year. Each set costs $50 to $150, plus the downtime for the swap.
A 120-volt test kiln is not built for marathon duty. Use it for bisque trials or glaze tests, not for your main production loads.
Keep the small kiln for experiments, and let your larger kiln handle the steady work. Otherwise, you will be buying parts while your big kiln just keeps going.
Safety Rules for Running a Hot Kiln on Your Workbench
A 1,300°F box inches from your elbow demands respect. This kiln is a controlled fire, so fire safety starts with bench placement. Keep it twelve inches from drywall on a non-combustible surface like concrete board.
Small kilns off-gas fumes during firing. Crack a window or use a vent hood.
Small kilns off-gas fumes during firing—crack a window or vent the space. Protect your lungs, protect your work.
Always run a slow preheat to burn off organics. Rushing this risks popping or bloating your ware.
Never leave the kiln unattended for long stretches, especially overnight. Check clearances before every firing.
Respect the heat and your test tiles will reward you. Ignore this and you will redecorate your garage with scorch marks.

Affordable tabletop firing for bisque and glaze test loads.
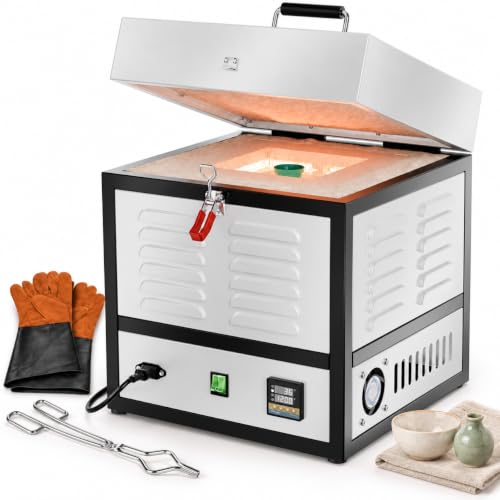
Run daily tests without filling a full-size kiln.

Space-saving design for small studios; ideal for test batches.
Browse discountedSmall Kilnson Amazon
Frequently Asked Questions
Can I Fire Pottery With a Small Kiln Indoors?
Yes, you can fire pottery with a small kiln indoors, but only if you set up proper ventilation and follow strict safety measures. Indoor air quality depends on exhausting fumes and heat directly outside, so place the kiln near a window or vent opening.
Use a dedicated vent system with a hood or a downdraft table that pulls fumes away from your breathing zone. In my experience, a detached garage or a well-sealed shed is a safer alternative than a living space, even with good airflow.
Check the clay and glaze manufacturer’s instructions for firing schedules, since your small kiln may heat unevenly. Also, install a smoke detector and a fire extinguisher nearby, and never leave the kiln running unattended during a firing cycle.
For related guidance, look up “kiln ventilation requirements” to learn about proper ducting and intake placement. Careful monitoring each time is non-negotiable, as small kilns can spike in temperature and off-gas more quickly than larger models.
Do Small Kilns Need a Dedicated Electrical Circuit?
Yes, small kilns do not strictly need a dedicated electrical circuit, but you should verify your specific voltage and amperage requirements first. A standard 120-volt unit often works on a 20-amp household breaker, yet checking your kiln’s nameplate is essential before plugging anything in.
In my experience, dedicated wiring is the safer choice, even if it is not always mandatory. It prevents nuisance tripping when other appliances share the same line.
Always confirm the outlet type and wire gauge match your kiln’s plug. For extra peace of mind, consider installing a surge protector to guard the electronic controller from power spikes.
If you are unsure about your electrical setup, consult a licensed electrician and follow the manufacturer’s instructions. Search for “kiln electrical requirements” to find more guidance from other potters.
What Is the Maximum Cone Rating for Small Kilns?
The maximum cone rating for small kilns depends on the electrical supply, with 120 volt models usually firing to Cone 5 or 6, while 208 and 240 volt versions can reach Cone 10. This limit dictates whether you can fire high fire stoneware or porcelain, so always match the kiln’s rating to your clay body’s maturation range.
Before buying, check the clay manufacturer’s spec sheet for the cone you need, then confirm that the kiln’s voltage in your studio can handle it. For a practical tip, look up the firing schedule for your glaze and compare it to the kiln’s maximum, because pushing a small kiln to its limit repeatedly can shorten element life.
If you regularly throw with mid fire stoneware, a 120 volt kiln rated for Cone 6 is often enough, but for reduction or high fire work, you need the higher voltage unit. I always recommend verifying the cone rating against the kiln’s manual, since some models list a lower “recommended” limit even if the max is higher. In my experience, leaving a little headroom, like firing to Cone 5 on a Cone 6 rated kiln, gives more consistent results.
Check your clay bag for the exact maturation temperature, and if the numbers don’t match, choose a different kiln or adjust your clay body accordingly.
Can I Fire Multiple Times in One Day With a Small Kiln?
Yes, you can fire multiple times in one day with a small kiln, but only if you plan for a complete cool-down and avoid back-to-back marathons. Two firings are realistic if you let the kiln drop below 200°F between sessions and check the element wear. In my experience, rushing a third firing risks element burnout and uneven heat, which can ruin your pots.
A concrete tip: program your kiln to crash-cool after the last soak, then prop the lid open once it’s below 500°F to speed things up safely. Always verify the manufacturer’s instructions for your specific model’s minimum cooling time; a typical small kiln needs several hours. Remember, medieval potters waited overnight for one melt, so patience protects your equipment and your glaze results.
Are Small Kilns Safe to Use on a Wooden Table?
Small kilns on wooden tables are generally not safe. The intense heat they generate can easily ignite the wood, creating a serious fire hazard even with a small unit.
For any portable kiln, always place it on a non-combustible surface like concrete, brick, or a metal stand. You also need to keep at least 18 inches of clearance from any flammable materials, including walls and curtains.
Ensure adequate kiln ventilation in the room to remove fumes and excess heat. A simple tip: before firing, touch the table beneath the kiln after it has been running for an hour; if it feels warm, the setup is unsafe.
Always check your kiln’s manual to confirm safe clearances, as they vary by model. If in doubt, treat the kiln like a hot stove and never leave it unattended during the first firing.
Rounding Up
Are small kilns worth it? Yes, but only if you respect their limits as precision tools, not production workhorses.
Check your electric bill and firing frequency, then write down how many glaze tests you actually run each week.
Test your glazes weekly on a tabletop model, keeping your full-size kiln off to save energy and stress.
A $400 tabletop model can help you perfect a new celadon in a month, not a year.
Treat it like a microscope for exploration, not a bulldozer for demand, and it will pay for itself in saved frustration.